Bluetooth is a technology that you might use every day; This could be wireless headphones, game controllers or heart rate monitors, which all use Bluetooth. Until recently, I imagined technology like this required implementation of low level drives in C, but oh'boy, was I wrong! Thanks to Web Bluetooth, it is now possible to communicate with Bluetooth peripherals through the browser with JavaScript!
We will explore how we can create a web app using React, TypeScript and Web Bluetooth to control our favourite smart lights to make our home ready for Christmas 🎅
Disclaimer: Web Bluetooth is unfortunately still an experimental feature, primarily only available in Google Chrome for Desktop and Android. Check out the browser overview to figure out if your favourite browser is currently supporting Web Bluetooth.
Getting started
Web Bluetooth is an interface for communication between the browser and Bluetooth Low Energy (BLE) peripherals. The primary concepts of Bluetooth Low Energy are:
- Devices and servers: The actual device you want to communicate with, and their server. (E.g. a smart bulb, heart rate monitor or a speaker)
- Services: The device's feature interface (E.g. a smart bulb's battery interface, or its light interface)
- Characteristics: The service's specific value (E.g. a smart bulb's light toggle, light strength or light color)
To connect to a device with Web Bluetooth, you have to use the function navigator.bluetooth.requestDevice. This will prompt a popup in your browser, displaying all the possible Bluetooth devices nearby. Note that we have to provide a filter of some sort, either by filtering by name (E.g. "Hue") or service provides (the service's UUID - A list of publicly allocated UUIDs can be found here.) Web Bluetooth has implemented some common services that can be provided as strings, which automatically will be translated to the corresponding UUID by Web Bluetooth - an example is "heart_rate".
Since we will try to connect to a smart bulb, which have no shorthands implemented in Web Bluetooth, we will have to use its UUID. But how do you find a service's UUID? Well, that really depends on the manufacturer; some will publicly announce its Bluetooth interfaces' UUIDs, while others won't. A great way of discovering Bluetooth devices, their services and their characteristics is an app called nRF Connect, available on iOS, Android and Desktop. We won't go too far in to the details on how to use this app; the main idea is to run a scan to find nearby devices and look at the services and characteristics the devices provide.
Turning the light on and off
There are multiple filters to use; services, namePrefix and name is only a subset. Best practice is to filter based on services, which will means that you can filter devices that actively announce that they are providing the service you are intending to use. Unfortunately, my smart lights did not announce the service they were providing, meaning that we have to filter based on their namePrefix. Our goal is to control a Philips Hue smart light, so we'll search for devices with names starting with "Hue". Since we are filtering by namePrefix, we also have to provide our intended service to the optionalServices field of the request object. If we only filter by namePrefix, we will get an error specifying that we have to either provide a service or optionalService.
const connect = async () => {
  const device = await navigator.bluetooth.requestDevice({
    filters: [
      {
        namePrefix: "Hue",
      },
    ],
    // Philips Hue Light Control Service
    optionalServices: ["932c32bd-0000-47a2-835a-a8d455b859dd"],
  });
  const server = await device.gatt?.connect();

  // Philips Hue Light Control Service
  const service = await server.getPrimaryService(
    "932c32bd-0000-47a2-835a-a8d455b859dd"
  );
};
Once we have connected to the server, we can start communicating with the different characteristics. The primary characteristics of a Hue bulb are:
- Philips Hue Light On/Off Toggle (
"932c32bd-0002-47a2-835a-a8d455b859dd") - Philips Hue Light Brightness Level (
"932c32bd-0003-47a2-835a-a8d455b859dd") - Philips Hue Light Color (
"932c32bd-0005-47a2-835a-a8d455b859dd")
We will start by connecting to the Toggle characteristic.
const toggleCharacteristic = await service?.getCharacteristic(
  "932c32bd-0002-47a2-835a-a8d455b859dd" // Philips Hue Light On/Off Toggle
);
Our next challenge is to be able to read and send data from and to the characteristics. The format the characteristic/device expects, once again depend on the manufacturer. Luckily the On/Off Toggle-characteristic is primitive, and only expects either a 0 (light off) or 1 (light on). Note that the data is read and written as a DataBuffer, which can be handled in different ways. Fortunately in this case, we only have to worry about a single byte.
const toggle = async () => {
  const currentValue = await toggleCharacteristic?.readValue();
  const lightIsCurrentlyOn = currentValue?.getUint8(0) ? true : false;

  await toggleCharacteristic?.writeValue(
    new Uint8Array([lightIsCurrentlyOn ? 0x0 : 0x1])
  );
};
This snippet will read the state of the toggleCharacteristic, which will return a DataBuffer with a single Uint8 value which is either 0 or 1, indicating whether the light is on or off. We will then write the opposite value back to the characteristic to be able to toggle the light. Remember that the writeValue function only accepts DataBuffers, which we can provide using a Uint8Array.
Great! We can now turn our smart light on and off! 💡
Changing the color of the light
One of the coolest features of smart light might be the flexible RGB lighting - so let's have a look at how we can change the color of the light!
We have earlier discovered the characteristic named Philips Hue Light Color ("932c32bd-0005-47a2-835a-a8d455b859dd"), which we now will connect to the same way we connected to the On/Off Toggle-characteristic.
const colorCharacteristic = await service?.getCharacteristic(
  "932c32bd-0005-47a2-835a-a8d455b859dd" // Philips Hue Light Color
);
Once again the required format of the data depends on the manufacturer, but in this case, the characteristic expects four bytes; 0x01 as a header followed by the value of red, blue and green (yes, in that order). We can therefore create these functions:
const setRedLight = () => {
  colorCharacteristic.writeValue(new Uint8Array([0x01, 0xff, 0x00, 0x00]));
};
const setBlueLight = () => {
  colorCharacteristic.writeValue(new Uint8Array([0x01, 0x00, 0xff, 0x00]));
};
const setGreenLight = () => {
  colorCharacteristic.writeValue(new Uint8Array([0x01, 0x00, 0x00, 0xff]));
};
We would assume that these functions would work - unfortunately, only setBlueLight is valid. This is once again due to the manufacturer and its specifications. The format of our three color bytes have some weird specifics; the total sum of the three values can be a maximum of 255 (0xFF), which is one full byte, and for some reason the characteristic does not like it when one value is full and the others are zero. To create a workaround for this our functions would look like this:
const setRedLight = () => {
  colorCharacteristic.writeValue(new Uint8Array([0x01, 0xfe, 0x01, 0x00]));
};
const setBlueLight = () => {
  colorCharacteristic.writeValue(new Uint8Array([0x01, 0x00, 0xfe, 0x01]));
};
const setGreenLight = () => {
  colorCharacteristic.writeValue(new Uint8Array([0x01, 0x01, 0x00, 0xfe]));
};
And voila! We can now set the color of our smart light!
Using Web Bluetooth with React
It is time to make everything we have made usable within our React app! A great way of enabling global access to functionality like this is to create a hook and a Context. We will start by creating the hook.
Initialize a react project, for example with create-react-app
$ npx create-react-app smart-light-controller --template typescriptSince we are using TypeScript, we'll have to install the types related to the web-bluetooth API.
$ npm install -D @types/web-bluetoothLet's combine what we have learned so far in a hook named useSmartLight.ts
/* hooks/useSmartLight.ts */

import * as React from "react";
export interface SmartLight {
  connect: () => void;
  isConnected: boolean;
  toggle: () => void;
}

export const useSmartLight = (): SmartLight => {
  const [isConnected, setIsConnected] = React.useState(false);
  const [toggleCharacteristic, setToggleCharacteristic] =
    React.useState<BluetoothRemoteGATTCharacteristic | null>(null);

  const connect = async () => {
    const device = await navigator.bluetooth.requestDevice({
      filters: [
        {
          namePrefix: "Hue",
        },
      ],
      // Philips Hue Light Control Service
      optionalServices: ["932c32bd-0000-47a2-835a-a8d455b859dd"],
    });
    const server = await device.gatt?.connect();

    // Philips Hue Light Control Service
    const service = await server.getPrimaryService(
      "932c32bd-0000-47a2-835a-a8d455b859dd"
    );

    const toggleChar = await service.getCharacteristic(
      "932c32bd-0002-47a2-835a-a8d455b859dd" // Philips Hue Light On/Off Toggle
    );

    setToggleCharacteristic(toggleChar);
    setIsConnected(true);
  };

  const toggle = async () => {
    const currentValue = await toggleCharacteristic?.readValue();
    const lightIsCurrentlyOn = currentValue?.getUint8(0) ? true : false;

    await toggleCharacteristic?.writeValue(
      new Uint8Array([lightIsCurrentlyOn ? 0x0 : 0x1])
    );
  };

  return { connect, toggle, isConnected };
};
We have skipped some null-checks to make the code easier to read, but this is handled in the source code, which can be found here. We have now created a hook which enables us to connect to a smart light, see if it is connected and to toggle it on and off!
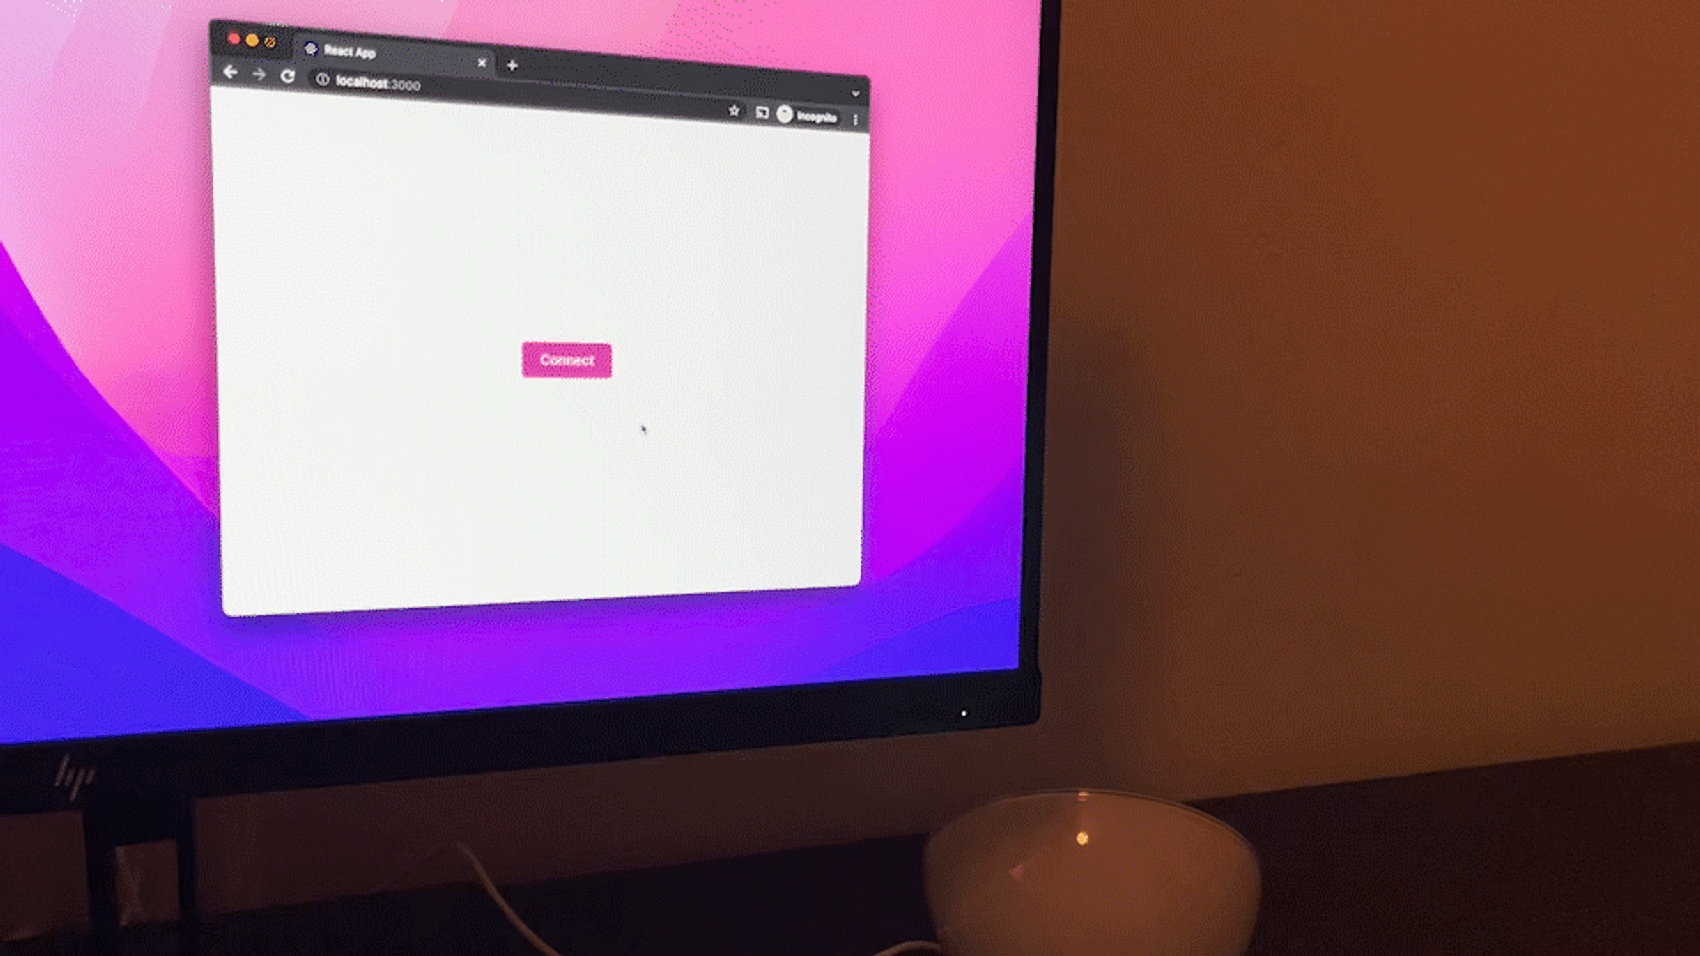
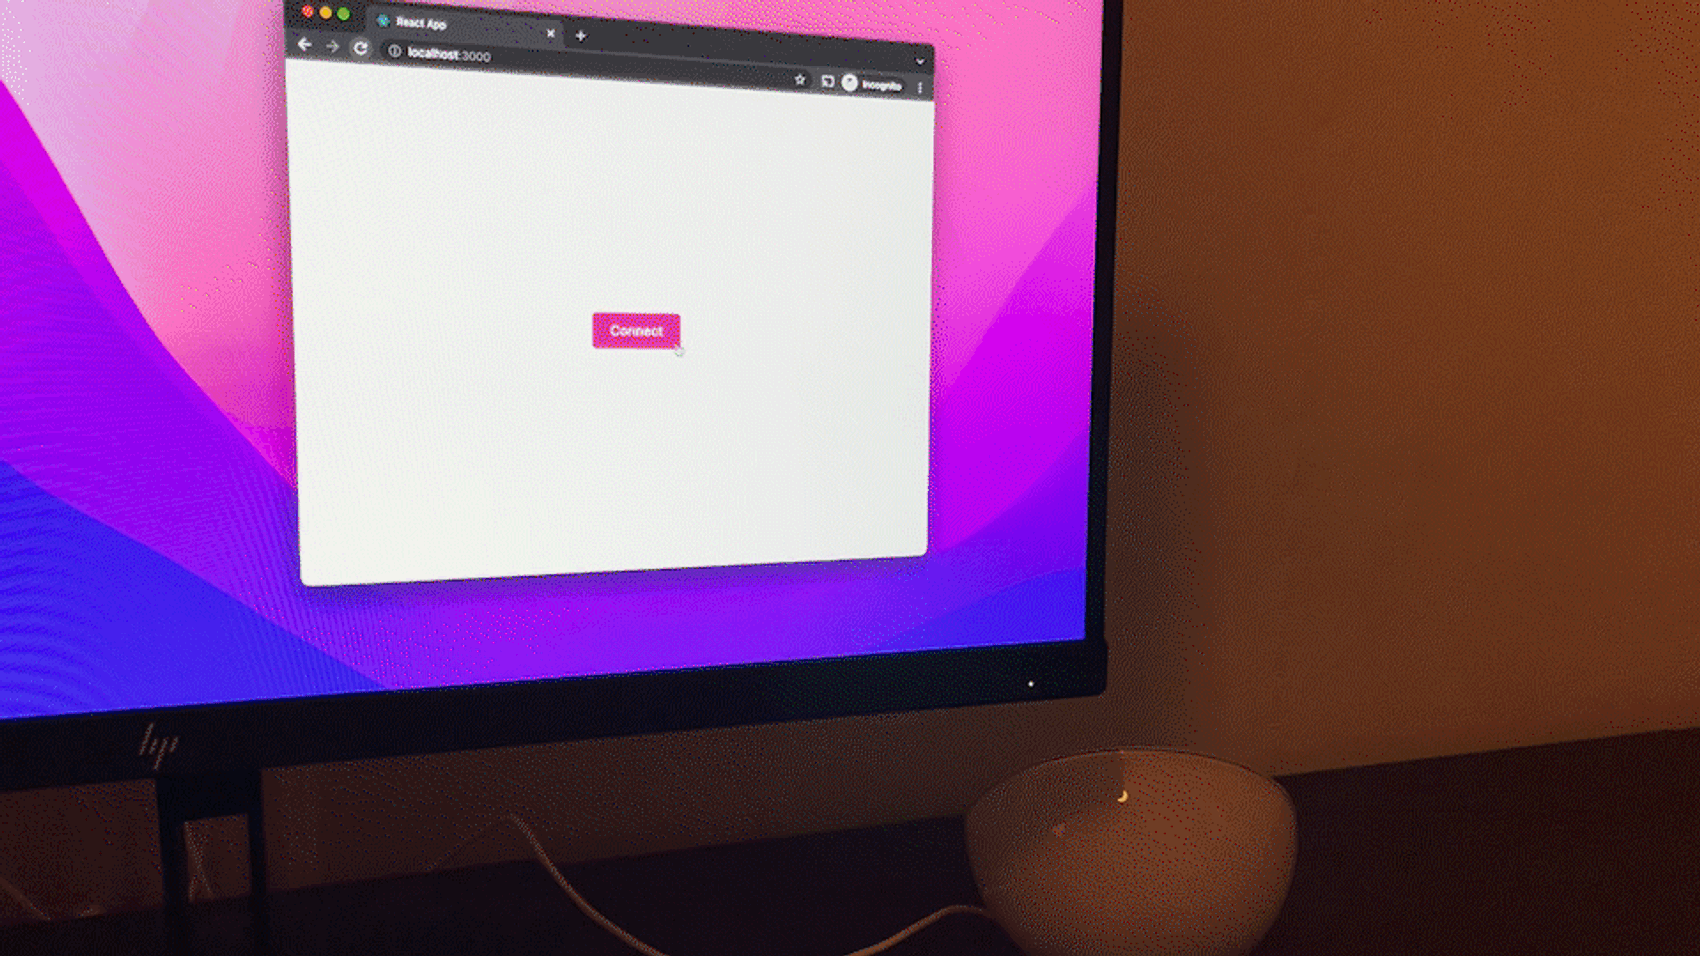
/* App.tsx */

import * as React from "react";
import { useSmartLight} from "./hooks/useSmartLight";

export const App = () => {
  const { connect, toggle, isConnected } = useSmartLight();
  return (
    <div
      style={{
        height: "100vh",
        display: "flex",
        justifyContent: "center",
        alignItems: "center",
      }}
    >
      {isConnected ? (
        <button onClick={toggle}>Toggle light</button>
      ) : (
        <button onClick={connect}>Connect</button>
      )}
    </div>
  );
};
We can now use our hook to control the smart light!
Let's add color control! We have to extend our hook with the color functions we defined earlier.
/* hooks/useSmartLight.ts */
import * as React from "react";
export interface SmartLight {
connect: () => void;
isConnected: boolean;
toggle: () => void;
setRedLight: () => void;
setGreenLight: () => void;
setBlueLight: () => void;
}
export const useSmartLight = (): SmartLight => {
...
const [colorCharacteristic, setColorCharacteristic] =
React.useState<BluetoothRemoteGATTCharacteristic | null>(null);
const connect = async () => {
...
// Philips Hue Light Control Service
const service = await server.getPrimaryService(
"932c32bd-0000-47a2-835a-a8d455b859dd"
);
const toggleChar = await service.getCharacteristic(
"932c32bd-0002-47a2-835a-a8d455b859dd" // Philips Hue Light On/Off Toggle
);
const colorChar = await service.getCharacteristic(
"932c32bd-0005-47a2-835a-a8d455b859dd" // Philips Hue Light Color
);
setToggleCharacteristic(toggleChar);
setColorCharacteristic(colorChar);
setIsConnected(true);
};
const toggle = async () => {
...
};
const setRedLight = () => {
colorCharacteristic?.writeValue(new Uint8Array([0x01, 0xfe, 0x01, 0x00]));
};
const setBlueLight = () => {
colorCharacteristic?.writeValue(new Uint8Array([0x01, 0x00, 0xfe, 0x01]));
};
const setGreenLight = () => {
colorCharacteristic?.writeValue(new Uint8Array([0x01, 0x01, 0x00, 0xfe]));
};
return {
connect,
toggle,
isConnected,
setRedLight,
setGreenLight,
setBlueLight,
};
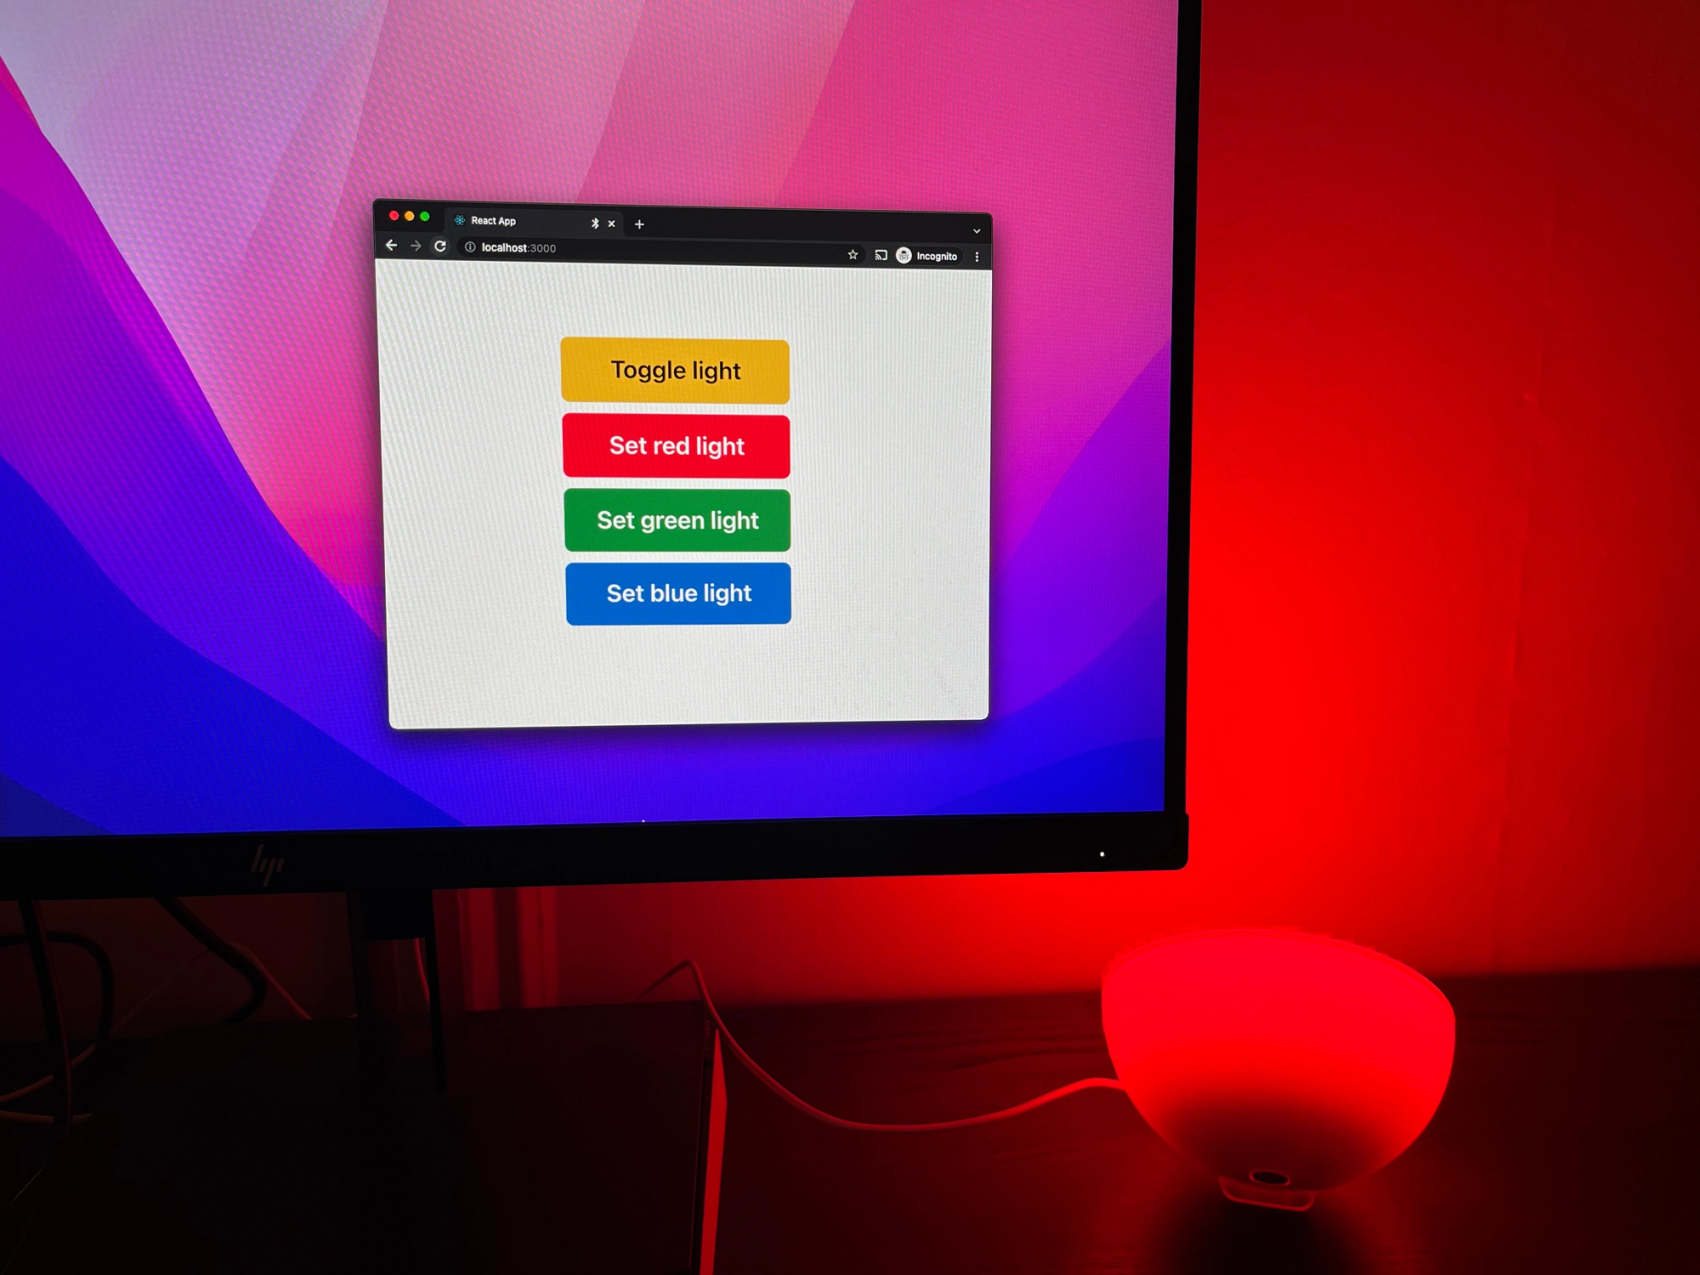
};Let's create some buttons and test our new functions!
/* App.tsx */

import * as React from "react";
import { useSmartLight} from "./hooks/useSmartLight";

export const App = () => {
  const {
    connect,
    toggle,
    isConnected,
    setRedLight,
    setGreenLight,
    setBlueLight,
  } = useSmartLight();
  return (
    <div
      style={{
        height: "100vh",
        display: "flex",
        justifyContent: "center",
        alignItems: "center",
      }}
    >
      {isConnected ? (
        <>
          <button onClick={toggle}>Toggle light</button>
          <button onClick={setRedLight}>Set red light</button>
          <button onClick={setGreenLight}>Set green light</button>
          <button onClick={setBlueLight}>Set blue light</button>
        <>
      ) : (
        <button onClick={connect}>Connect</button>
      )}
    </div>
  );
};
We can now toggle and change the color of our light!
Now what?
Now that we have gotten a basic understanding of how we can control our smart light, we can extend our functionality interface by implementing e.g. dimming or functionality to change the color based on a standard color hex string (#RRGGBB). An other improvement can be to create a SmartLightContextProvider, which will ensure us that our device is easily available through our app. These changes will not be covered in this article, but we have created a demo page that you can have a look at, with the source code being available here.
Have fun experimenting with Bluetooth devices! 👋