
Wouldn’t it be sweet to be able to test your application straight in production? Not having to wait 20 min to redeploy and roll out your new features? ⏱
With LaunchDarkly you can do just that!!💥
LaunchDarkly is a service for adding feature toggles to your code. It lets you turn features on or off without having to re-deploy everytime you want to turn a feature on or off in your production- / test- or QA-environment.
This kind of functionality can be very useful if you would like to add new features to your apps and would like to control them after deployment. LaunchDarkly provides a mechanism for non-technical people to manage the behavior of your running apps and services.
With this kind of service you get more control over the whole process if something does not go according to plan, e.g. feature does not behave or work as intended. If this were the case, you would not have to redeploy, simply turn off the feature.
Using LaunchDarkly you can set a feature, or for that matter an entire app, to be rolled out to either a specific set of users or just users that meet a certain requirement. In addition to this, feature flags can also be configured to only be available to user with a certain kind of email-domain. You are also able to expose a new feature to only 20 % of your users if you want to test your work with a small portion of your users.
Great✔, but what if the SDK goes down?
LaunchDarkly is often consumed by an SDK - but what happanes when it goes down? When the SDK initializes, it opens a streaming connection to LaunchDarkly. The response contains the SDK’s current state, which the SDK uses to determine wheter the flag needs to be changed.
If the SDK loses connectivity to LaunchDarkly, it will repeatedly try to establish a streaming connection until it succeeds. If you change the value of the flag before the SDK receives its initial state, or you try to fetch a flag which otherwise doesn’t exist, then the SDK returns a fallback value you can specify in the flag’s settings.
Setting up an account 📋
To get started make sure you have a valid LaunchDarkly account (you can start a trial if you haven’t done so already).
First go to the projects section: https://app.launchdarkly.com/settings/projects
Click on the “New Project” button, name it “LD React”
In the LD React project section click the “New Environment” button
Copy the Client Side ID
Paste the Client Side ID in the withTogglesProvider component configuration object where, replace the string that reads “{REPLACE WITH LD CLIENT SIDE ID}” with the real value for development purposes
Make sure you have the box: “make this flag available for the Client SDK” checked, by enabling the option below
Now you are basically done configuring LaunchDarkly and you are ready to start implementing your toggles in your own React application
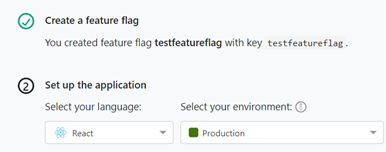
Make your first feature flag 🚩
To get started, spin up an empty project with create-react-app. Head over to the quickstart which takes you through the initial steps to create a feature flag.
Now install LaunchDarkly SDK by running npm install — save launchdarkly-react-client-sdk@2.14.0in the terminal.
Since LD also support hooks we will do an example with that. But first… a small introduction to useFlags.
useFlags is a custom hook which returns all feature flags. It uses the useContext primitive to access the LaunchDarkly context set up by asyncWithLDProvider or withLDProvider. You will still need to use the asyncWithLDProvider or the withLDProvider higher-order component at the root of your application to initialize the React SDK and populate the context with LDClientLDClient and your flags.
useLDClient is the second custom hook which returns the underlying LaunchDarkly JavaScript SDK client object. Like the useFlags custom hook, useLDClient also uses the useContext primitive to access the LaunchDarkly context set up by asyncWithLDProvider or withLDProvider. You will still need to use the asyncWithLDProvider or the withLDProvider higher-order component to initialize the React SDK to use this custom hook.
In our create-react-app head over to App.js and import useFlag:
import { withLDProvider } from ‘launchdarkly-react-client-sdk’;Next change is to change the export default to use your environment-specific client ID and a sample user:
export default withLDProvider(
{clientSideID: ‘Your client side id’,

user: {
 “key”: “user_key”,
 “name”: “User Name”,
 “email”: “User@email.com”
}
})(App);
Now create a new file, e.g. helloWorld.js, in the same directory as App.jsand import React and useFlags and useLDClientlike this:
import React from ‘react’;
import { useFlags, useLDClient } from ‘launchdarkly-react-client-sdk’;
Create the HelloWorld component that gets passed the state of the flag and returns an element based on the state of our feature flag.
At this point, make sure you have a flag called dev-test-flag in your project. Make sure you make it available for the client side js sdk.
const HelloWorld = () => {
  const { devTestFlag } = useFlags();
  const ldClient = useLDClient();
  const onLoginSuccessful = () => ldClient.identify({ key: "aa0ceb" });
  return <div>{devTestFlag ? "Flag on" : "Flag off"}</div>;
};

export default HelloWorld;
Finally, go back to App.js and import the HelloWorld component:
import HelloWorld from ‘./helloWorld’;

function App() {
  return (
   <div className=”App”>
    <header className=”App-header”>
     <HelloWorld />
        // other code
    </header>
   </div>
  );
}
Where to go next
Aside from feature flags, LaunchDarkly also provides support for A/B testing and tracking goals.
Being able to display certain info/features for specific groups and then getting analytics on user interactions is super useful. This kind of fuctionality may also be useful if you want to know how much traffic is hitting your feature flag.
How are we using LaunchDarkly?
At our customer, we are using this to save tons of hours by not having to re-deploy for every feature we want to toggle. It will also make it easier to do such things as acceptance testing straight in production with the product owner, bypassing the need for manual verification in a QA environment first.