If you want to follow along and complete the steps in this article you need the following tools installed on your computer:
- A google cloud project with where you are the owner
- The gcloud command line tools
- Kubectl command line tools
- Helm 3 installed
- NodeJS (optional) if you want to run the application locally
You also need to enable the Kubernetes engine and Container Registry apis in GCP. The code used in this article can be found on GitHub.
What is Helm?
Helm describes itself as the package manager for Kubernetes. By creating Helm charts, we can describe all the Kubernetes resources of our application, such as deployments, configmaps, and services, in one place. A Helm chart specifies values that a user can override when deploying an application, making it easy to customize deployments across different environments.
There are three concepts you need to know when working with Helm:
- A chart describes the application you want to run in Kubernetes, along with its dependencies.
- A repository is a web server where packaged charts are shared. The official stable repository for example, has ready made charts for applications such as Memcached, Postgresql, and MongoDB.
- A release is a running instance of a chart.
Helm installs charts into Kubernetes, creating a new release for each >installation. And to find new charts, you can search Helm chart repositories.
The Helm Docs
So, with that in mind, let's see how we can deploy a web application on GKE using Helm.
The Sample Application
To keep things as simple as possible we will deploy a simple web server that listens for requests and replies with a christmasy message. The app is written in NodeJS and creates an Express web server.
package.json:
{
  "name": "hello-christmas",
  "version": "1.0.0",
  "description": "",
  "main": "index.js",
  "scripts": {
    "test": "echo \"Error: no test specified\" && exit 1"
  },
  "author": "",
  "license": "ISC",
  "dependencies": {
    "express": "^4.17.1",
    "morgan": "^1.9.1"
  }
}
index.js:
const express = require("express");
const morgan = require("morgan");

const app = express();
const port = process.env.PORT || 8000;

app.use(morgan("combined"));

app.get("/", (req, res) => {
  res.send("Christmas is coming 🎅");
});

app.listen(port, () => console.log(`Christmas is comping on ${port}!`));
Dockerfile
FROM node:12.7.0-alpine

WORKDIR '/app'

COPY . .

RUN npm install
EXPOSE 8000

CMD ["node", "index.js"]
To test the app locally run npm install and node index.js. You should now see the app running by visiting http://localhost:8000/ in your browser.
The next step is to build the docker image and push it to a container registry. We'll tag the first version of our app with 1:
docker build . -t eu.gcr.io/[GCP-PROJECT-NAME]/app:1
docker push eu.gcr.io/[GCP-PROJECT-NAME]/app:1
Once these commands have finished you should be able to visit the container registry and see the image there.
The Kubernetes Cluster
Now that we have published the image to the registry, we need a place to run our application. To achieve this, we will create a Kubernetes cluster on Google Kubernetes Engine.
gcloud container clusters create santas-workshop
It will take a few minutes before the cluster is ready, so go grab some eggnog while the servers are spinning up.
Now that the cluster is ready, and we have pushed our deployable app to the container registry, we need to describe our deployment. This is where Helm comes in.
Creating the Helm Chart
To create a new chart run the following command (christmas-app) is the name of the chart we want to deploy):
helm create christmas-app
This will create a new folder with the name christmas-app with this structure:
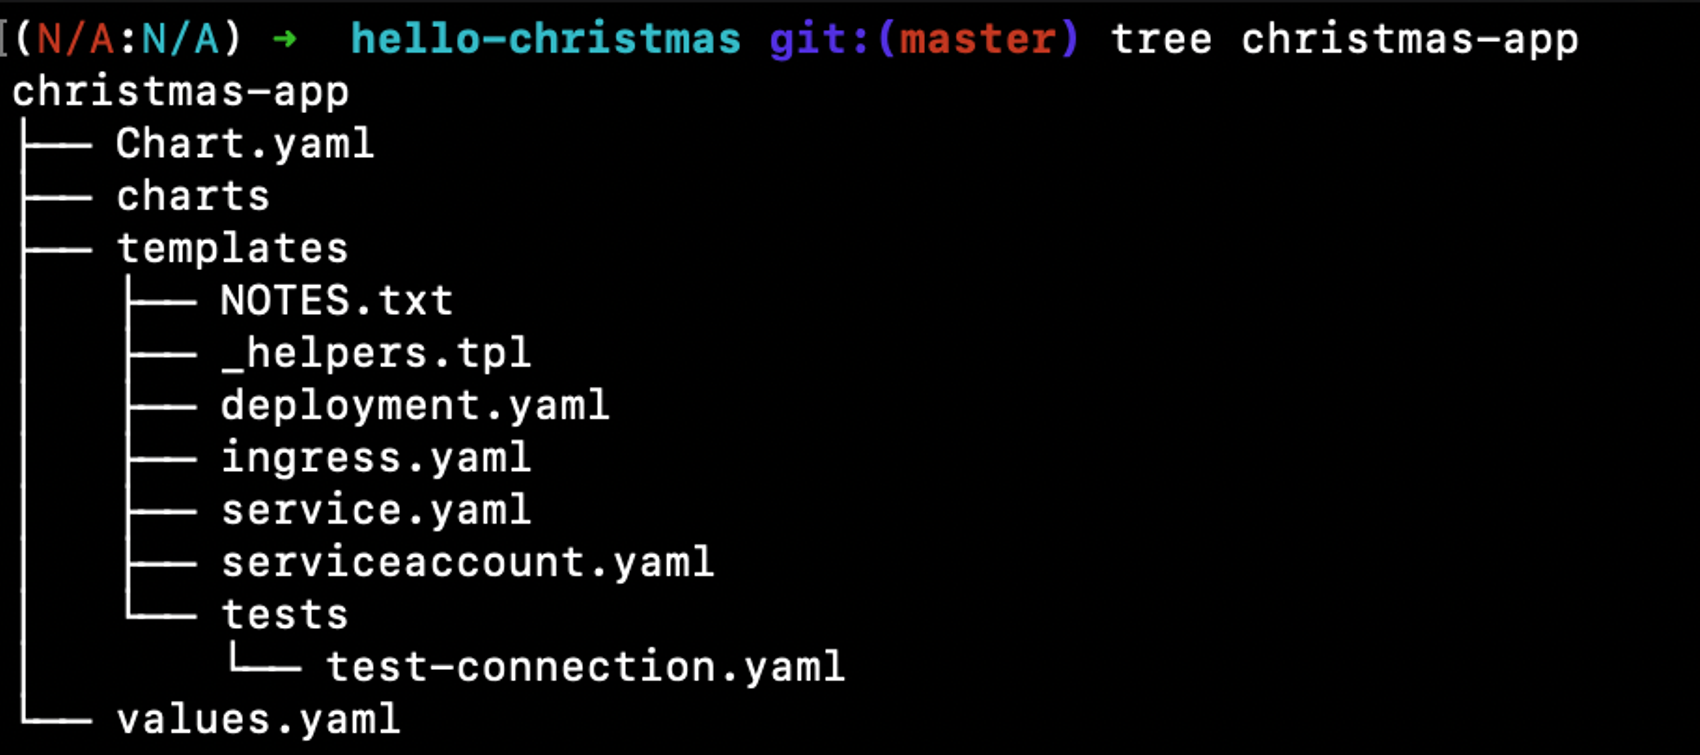
For the purposes of this article we will only edit four of those files.
- Chart.yaml: Metadata about our application
- values.yaml: Variables for our application
- templates/deployment.yaml: Kubernetes deployment file
- templates/service.yaml: Kubernetes service file
The files created use the Helm Templating Language. The Helm templating language supports flow control, value templating, variables and functions.
We need to edit some of the files before we can deploy our app. We will start by setting appVersion and version in Chart.yaml to 1.
The next step is to update the values.yaml file. The values in a chart are used for user supplied values, often application specific configurations, and other values that can change between deployments. It is possible to override the values in values.yaml when running helm install or helm upgrade.
Set image.repository to eu.gcr.io/[GCP-PROJECT-NAME]/app. The appVersion from Chart.yaml will be used as the docker image tag.
Our docker image exposes port 8000, so we need to update the container specification in deployment.yaml accordingly:
containers:
  - name: { { .Chart.Name } }
    securityContext: { { - toYaml .Values.securityContext | nindent 12 } }
    image: "{{ .Values.image.repository }}:{{ .Chart.AppVersion }}"
    imagePullPolicy: { { .Values.image.pullPolicy } }
    ports:
      - name: http
        containerPort: 8000
        protocol: TCP
Now that we’ve specified what docker image to use for our deployment, let’s package it up and try to deploy it. First we’ll run the linter:
helm lint christmas-app
If there are no errors we can package our deployment. This will create a compressed and versioned archive that represents our entire deployment. Neat!
helm package christmas-app
To list the configurable values and their current value you can run:
helm show values christmas-app-1.tgz
Now we install our application on the cluster. christmasapp is the name of the release of our app.
helm install christmasapp christmas-app-1.tgz
To list all releases running in a cluster we can run helm ls. The output gives us a quick overview of what apps we have running, including release time and version.

We can also use the kubectl tool to check the status of how the deployment is going:
kubectl get pods
Once the pod is in the running state, let’s check the logs:
kubectl logs <pod name>
You should see the log messages created by our web server. Great! But it is a web server, so we want to be able to connect to it. The astute reader may have noticed that we didn’t create a service with a public IP address. This can be confirmed by running:
kubectl get svc

Helm is nice enough to give us the command to enable port forwarding from our local machine:
export POD_NAME=$(kubectl get pods --namespace default -l "app.kubernetes.io/name=christmas-app,app.kubernetes.io/instance=christmasapp" -o jsonpath="{.items[0].metadata.name}")
kubectl --namespace default port-forward $POD_NAME 8080:8000
Now we can visit http://localhost:8080/ and see that our app is running. Obviously we don’t want to use port forwarding to access our app, so we will need to update our chart.
Adding a Load Balancer
First we edit values.yaml and set the service type to a load balancer.
service:
  type: LoadBalancer
  port: 80
  targetPort: 8000
We also need to change the file describing the service (service.yaml) by adding the target port:
spec:
  type: { { .Values.service.type } }
  ports:
    - protocol: TCP
      port: { { .Values.service.port } }
      targetPort: { { .Values.service.targetPort } }
Finally, we bump the version number in Chart.yaml to 2:
version: 2Now that the templates have been added we can package it up. This will create a new file with the name christmas-app-2.tgz:
helm package christmas-app
Now it's time to roll out the new release. To do this we use the helm upgrade command. Note that to most Helm commands we can add the --dry-run flag to see what changes the command will create.
helm upgrade christmasapp christmas-app-2.tgzWe have to wait for a bit until the load balancer gets an IP address. We can watch it happen with:
kubectl get svc -w
Once a value appears under EXTERNAL-IP, copy it and open it in the browser. You should see the message from our server!
Updating the Application
Let’s say we want to release a new version of our app that counts down the days until Christmas. We update the javascript file, build and push a new docker image:
docker build . -t eu.gcr.io/julekalender/app:2
docker push eu.gcr.io/julekalender/app:2
We have tagged the image with 2, so we update the appVersion in Chart.yaml. We also need to update the chart version to 3. Note the difference between the application version and chart version. Then we package the new release:
helm package christmasapp
helm upgrade christmasapp christmas-app-3.tgz
Helm will detect the changes and create a new pod with the updated app. When the new version is ready it will shut down the old pod. This way there is no downtime for our mission critical Christmas app!
If you visit the IP you should see the updated app.
Release History and Rollback
The following command allows us to see the release history of our application:
helm history christmasapp
If we want to undo the latest change, rolling back to the previous revision is as simple as:
helm rollback christmasapp 0Soon we will see the previous version of the app. By checking the history, we can see that the rollback is added as a new release. This way we have full control over our release history.

Final Comments
There is a lot more to Helm than covered in this article. Using Helm to manage apps on Kubernetes makes our applications more configurable, composable and much simpler to manage across many environment. Version management is simple, and undoing a broken release is as simple as one command.
By using private chart repositories it is simple to share charts in an organsiation. Helm can be extended with plugins to create additional features. Helm-gcs for example makes it possible to use Google Cloud Storage as a chart repository.
Note: If you created your own Kubernetes cluster, it is probably a good idea to delete it when you are done testing Helm!