How to lazy render large data tables to up performance
When working with large tables with many rows and columns you might find that your application is starting to lag. Especially if your table has a lot of custom styles, clickable rows or sortable columns, rendering can become an issue.
In this post I'll show you how you can lazy render your table to make it fast and snappy!
3 min read
·
By Miina Lervik
·
December 2, 2021

What is lazy rendering
Lazy rendering means that you only render what you need to display. With very large tables we want to avoid rendering all the rows as we can't see them anyway. By only rendering what we need we can speed up our application and make it smooth to interact with.
How does it work
When drawing up our table we don't want to render all the rows. We add a filler row in the beginning and at the end of our table which will increase/decrease in size as we scroll. We will need a listener to monitor how far down we have scrolled and then calculate how large our filler rows should be. We will also need to calculate which rows we should render and which we should not. In order to make scrolling smooth I recommend rendering more rows than what is visible for the user. This way we won't experience that the table is flickering when scrolling fast.
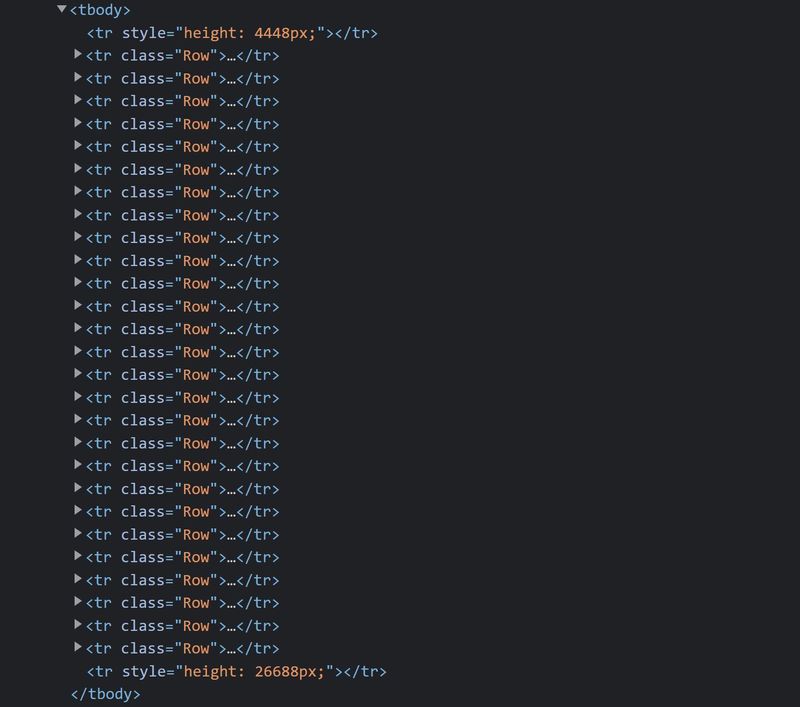
So although we might have thousands of rows, when inspecting our code it will look something like this:
Let's code!
The magic will happen inside the table body, so lets start making that.
We will need some state variables to store values for how far we have scrolled, which index in our data array we should start rendering from, and which index in the data array should be the last to be render.
const TableBody = ({ data }) => {
  const [displayStart, setDisplayStart] = React.useState(0);
  const [displayEnd, setDisplayEnd] = React.useState(0);
  const [scrollPosition, setScrollPosition] = React.useState(0);

  const rows = []; // this will be filled in later

  return <tbody>{rows}</tbody>;
};

export default TableBody;
Static values
We will also need some static values for our calculations later. We will need to know how large each row is and how large the visible display is, in this case the screen height. An offset is needed so that we render a bit more than what we see. I want to render twice as many rows as I actually need to make scrolling smooth. Finally we need to know how many rows we should render at a time.
const itemRowHeight = 32; // same height as each row (mine are 32px)
const screenHeight = Math.max(
  document.documentElement.clientHeight,
  window.innerHeight || 0
); // get the height of the screen
const offset = screenHeight; // We want to render more than we see, or else we will see nothing when scrolling fast
const rowsToRender = Math.floor((screenHeight + offset) / itemRowHeight);
Calculating which rows to display
As already mentioned we want to render twice as many rows as we need. About half of those rows should be on the top, and the other half at the bottom. This way scrolling both ways will be smooth.
Then we need to find which index in our array should be the first to be rendered and which should be the last.
const setDisplayPositions = React.useCallback(
    (scroll) => {
      // we want to start rendering a bit above the visible screen
      const scrollWithOffset = Math.floor(scroll - rowsToRender - offset / 2);
      // start position should never be less than 0
      const displayStartPosition = Math.round(
        Math.max(0, Math.floor(scrollWithOffset / itemRowHeight))
      );

      // end position should never be larger than our data array
      const displayEndPosition = Math.round(
        Math.min(displayStartPosition + rowsToRender, data.length)
      );

      setDisplayStart(displayStartPosition);
      setDisplayEnd(displayEndPosition);
    },
    [data.length]
  );
This method is a CallBack so that we can call it from a useEffect later on. If our data set changes in length we will need to recalculate the start and end position.
Add a scroll listener
Attach a listener to the scroll event on the window. This function will run every time the scroll changes.
  React.useEffect(() => {
    const onScroll = throttle(() => {
      const scrollTop = window.scrollY;
      if (data.length !== 0) {
        setScrollPosition(scrollTop);
        setDisplayPositions(scrollTop);
      }
    }, 100);

    window.addEventListener("scroll", onScroll);

    return () => {
      window.removeEventListener("scroll", onScroll);
    };
  }, [setDisplayPositions, data.length]);
We add throttle in order to optimize our scroll. This is done so we don't call our onScroll function on absolutely every pixel we scroll as that will be a bit excessive. Now it will only be invoked on every 100 millisecond.
We also need to make sure our calculations are run when we first render our page, even before we have started to scroll. So let's add this
  React.useEffect(() => {
    setDisplayPositions(scrollPosition);
  }, [scrollPosition, setDisplayPositions]);
Adding our rows
Finally we can add our rows. We will add a filler row at the top and bottom.Then we will add the rows we want to actually render.
const rows = [];

  // add a filler row at the top. The further down we scroll the taller this will be
  rows.push(
    <tr
      key="startRowFiller"
      style={{ height: displayStart * itemRowHeight }}
    ></tr>
  );

  // add the rows to actually render
  for (let i = displayStart; i < displayEnd; ++i) {
    const row = data[i];
    if (row !== undefined) {
      rows.push(
        <tr key={row.id} className="Row">
          <td>{row.id}</td>
          <td>{row.first_name}</td>
          <td>{row.last_name}</td>
          <td>{row.email}</td>
          <td>{row.gender}</td>
        </tr>
      );
    }
  }

  // add a filler row at the end. The further up we scroll the taller this will be
  rows.push(
    <tr
      key="endRowFiller"
      style={{ height: (data.length - displayEnd) * itemRowHeight }}
    ></tr>
  );
And now we're done!
