Wintertime has always struck me as somewhat offset from the holiday season. The weather gets cold and dark, but snow seems to be in its primetime around January and February, at least here in Oslo. As a result, people around the world may have to resort to simply dreaming of a white Christmas. But regardless of where you live and the level of crystalline precipitation thereabouts, we have the technology to make it snow right now! In your browser at least.
There are a number of ways to make snow in your browser. For example, clever use of HTML and SCSS can get you some fairly dynamic snow. CSS really isn't built for that kind of thing though, and you'll often get some rough performance if you want a whole lot of particles. Plus, why stop at just snow? Let's make a nice winter landscape!
For today's article we'll use my weapon of choice for creative coding, namely p5.js. It's a library quite literally made for creative coding, effectively offering a wrapper around the HTML Canvas API to make it easier to work with. As opposed to Canvas, most of the p5 API is fairly self-explanatory. For example, drawing a circle is as simple as circle(x, y, diameter). Let's do that right now!
Drawing a delightful disk
As we move through this article we will provide sandboxes like the one below so you can see both the code and the result. The live editor doesn't seem to update the result, so just press "Open Sandbox" in the lower right corner if you want to tweak parameters. I highly recommend it! We will explain the code following each sandbox regardless.
P5 offers an API of functions and values, and it runs by looking for certain named functions in your code. The most important ones to know about are setup() and draw():
The setup function runs at the start when you open the sketch, and only once. That's handy for setting up your data structure, variables, and so on. Most importantly, you'll want to create a canvas element with a certain resolution. Here we went with (1080, 1350) because that's the maximum resolution Instagram accepts 😉. We also draw a background at the start for some warm cozy vibes to go with our upcoming snow.
Meanwhile, the draw function runs every time your screen renders a new frame. This typically occurs around 60 times per second, but some screens offer a higher frame rate. The draw function is where we'll place most of our shape computation, but for now we just draw a big circle at the center of the canvas.
I won't go too in-depth on the p5 API, as you can find just about everything you need in the reference or the examples. There's even an example of simulating snowflakes there, which served as one of the main inspirations for this article. Speaking of which, let's get started on simulating snow.
Simulating some static snow
We should probably have more than a single snowflake. In fact, we should probably have infinite snowflakes. There are many clever ways to do that kind of thing, and I wouldn't really say one way is worse than the other. As long as the code can expand to support more features then you'll be fine! You probably won't look back at the code when you feel like you've completed the sketch anyways, so don't fret over code quality. But I digress! Here is our first set of snowflakes:
At the top of the code I put some of the constants that can be tweaked for the sketch, making it easier to play around with values. In order to keep track of our snowflakes, I've created a very basic list of objects in the setup function where we'll store their position. At the start we'll just offer them a random spot on the canvas.
In the draw function we'll iterate through this list of objects and draw a circle to represent each snowflake. After it is drawn, we'll update the position of the snowflake so it will look like it moved in the next frame. If the snowflake has passed beyond the edge of the canvas, we'll just put it right back on the top again. Also note that we now draw the background at the start of every frame so we have a clear canvas every time we draw the snowflakes at their new positions.
This is a great start, but the snowflakes all seem fairly static. While their pattern is random, the pattern doesn't change and the looping can be very obvious as a result. Furthermore, our upcoming landscape scene is lacking in depth, so let's add some!
Learning to love layers of lists
To provide som illusion of depth, we can think of some basics of perspective. Like imagine looking out the window of a moving train and looking at the passing landscape. Things that are further away from the train look smaller and like they move slower. Conversely, things that are close by look bigger and move faster.
The snowflake data structure is now a list of lists, where the inner lists represent a layer of snowflakes. While we could have simply assigned a random layer to a snowflake at initialization, this structure will come in handy when we play around with depth again later. Now that the data structure is layered, we can make the snowflakes appear layered too. We've created the updateSnowflake() function to get all the snowflake computation in one place. The first thing we'll do is adjust the size of the snowflakes by simply scaling the size of the snowflakes with their layer index.
In terms of movement we can also make snowflakes in the back move slightly slower than the ones in the front. Instead of a single static layer, we now have multiple static layers! To alleviate this we can assign each snowflake with a mass during the setup function, which factors into the speed at which the snowflakes fall. That way the pattern of snowflakes will change ever so slightly.
Now we're really getting somewhere! We have layering and some fairly dynamic vertical movement. However, there's a whole other axis we can work with too! Let's get into making some wind.
Working with wavy wind
Wind is sort of chaotic, so we need some sort of randomness. We've already used “true” randomness for the positioning and mass of the snowflakes, but that won't necessarily help us here. If we were to randomly move the snowflakes now, it would look all jittery, so we need to somehow make it look smooth. Thankfully I have just the tool for the job, and its name is Perlin noise.
Perlin noise kind of deserves an article of its own, as it really is just about the most powerful tool p5 has to offer (in my opinion). In the simplest of terms, Perlin noise can be described as “random, but smooth”. Let's look at a quick comparison:
The noise() function works similarly to random(), in that both functions return a number between 0 and 1. The random function gives you a different result every time, and is great for when you want uniform distribution. The upside of the noise function is that when you call the function with the same parameters two times, you get the same result. Similarly, calling the function two times with similar parameters offers a similar result. If you really want to get into some use cases of Perlin noise, then I highly recommend the introduction to Daniel Shiffman's The Nature of Code. He uses a language called Processing, which is what p5.js is based on. The syntax is pretty much Java and all the functions work in pretty much the same way as they do in p5, so the code should be easy to translate. Anyway, let's get back to our wind.
The wind is computed in the latter half of our updateSnowflake() function. The noise function takes 1-3 parameters, representing dimensions. Or whatever you want them to, really. Let's dissect this line:
const wind = noise(snowflake.l, snowflake.y * WIND_CHANGE, frameCount * WIND_CHANGE) - 0.5;
First of all, we supply the snowflake layer as a parameter. That way we get slightly different wind for each layer, contributing to the chaos of it all. Secondly, we send in the current y-position of the snowflake. This is kind of what we did in the random vs. noise comparison above, just rotated 90 degrees. Thirdly, we change the Perlin noise over time. The frameCount value is provided to us by p5, and represents the number of frames that have passed since the sketch initialized. Note that the last two parameters here are tuned by our `WIND_CHANGE constant, which is a fairly low number. This ties back to the whole “similar parameters get similar values” thing, as a smaller change in parameters makes for a smoother curve.
Finally, the noise function returns a value between 0 and 1. We subtract -0.5 so that it returns a value between -0.5 and 0.5, making the snow swing back and forth.
With the wind in order, we now have ourselves some pretty cool snow! Honestly, writing the explanation took ten times the amount of time it took to code the snow itself. Once you get into the groove and start to get familiar with the tools at your disposal, the possibilities are endless! With our snow in order, we can combine our depth system and Perlin noise to generate some landscape to go with it! Let's hide the snowflakes for now and get to work on this winter wonderland.
Making majestic mountains
The ideal winter landscape will undoubtedly differ from person to person, but today I'll offer some escapism from the gray and dark city life many of us have grown accustomed to. Let's make a beautiful winter morning with great weather and some sweeping scenery!
We've added a more appropriate sky color, a sun, and some mountain ridges. The sun is drawn right on top of the background in the draw function. Our custom drawSun function is fairly simple, as it really is just a circle with some colored shadow. The shadow is an excellent example of how one can still use methods and properties of the Canvas API within p5, giving us this grossly incandescent sun!
For the mountain ridges we've made our own custom draw function again, called drawRidge(). This is where our layers of snow come in handy too, as we can call the drawRidge function as we iterate through our layers of snowflakes. This will then draw the layers in order so that the snowflakes should fall between the mountain ridges, providing additional depth! If each snowflake was simply assigned a random depth instead of the data structure itself being layered, we wouldn't get this effect.
The drawRidge function does a few neat things. First of all, we've defined two ridge colors at the top of the file, and we use those to determine the color of each ridge. P5 provides us with the lerpColor() function, which blends one color with a certain amount of the other. The first two parameters are our colors, and the third is a number between 0 and 1 determining how close the result will be to the first or second color. For example, using lerpColor(“red”, “blue”, 0.25) would result in a purple color closer to red, whereas lerpColor(“red”, “blue”, 1) would be completely blue. We opted for a lighter and more desaturated color in the distance, with a darker and somewhat clearer color close by. This again offers some illusion of depth, and we get a pretty cool stepwise gradient effect. Now I can't say I know as much about color theory as I'd like, but it also kind of looks like a given ridge gets lighter when it's closer to the next ridge, even though we only use one color per ridge. My eyes may be playing tricks on me, but this little optical illusion offers more depth to the scene, so I won't complain.
For the actual drawing of the ridge, we are given a y-coordinate and iterate through the row of pixels at that given coordinate. Simply drawing this shape would just give a straight line, but we use Perlin noise to make smooth and satisfyingly random inclines across the ridge. How far we zoom in on the noise determines how smooth the steps between the noise is, so we can make these ridges jagged and chaotic by simply tweaking some parameters too.
Note that we step over some pixels to reduce the amount of computation needed. One can hardly tell the difference visually with our default parameters, but chaotic ridges would look more spiky as a result of this.
Ready to reveal our riveting results
We're getting very close to the end result here, but the sun isn't quite right. It's sort of always the same flat thing, but how would we make it more dynamic? We could place the sun randomly, but I like how it looks just peeking over the ridges in the back. However, that implies our scene is sort of a sunrise or sunset, which is typically accompanied by a gradient in the sky! Thankfully we have already made just the thing for that. Oh, and we should also turn that snow back on.
I don't know about you, but that looks pretty nice to me. The layers of snow fall down gently between the mountain ridges, and we get that great gradient effect in the sky too. For the sky we just used the drawRidge function with different colors a few times before drawing the sun. The colors of the sky ridges are determined by blending the color of the sun with the original sky color.
Now that we have a playground, let's play around with some parameters and see what we can get out of it! You can open the final sandbox yourselves here, tweak parameters, save, and the result should update. Here are some images I got from tweaking the parameters at the top:
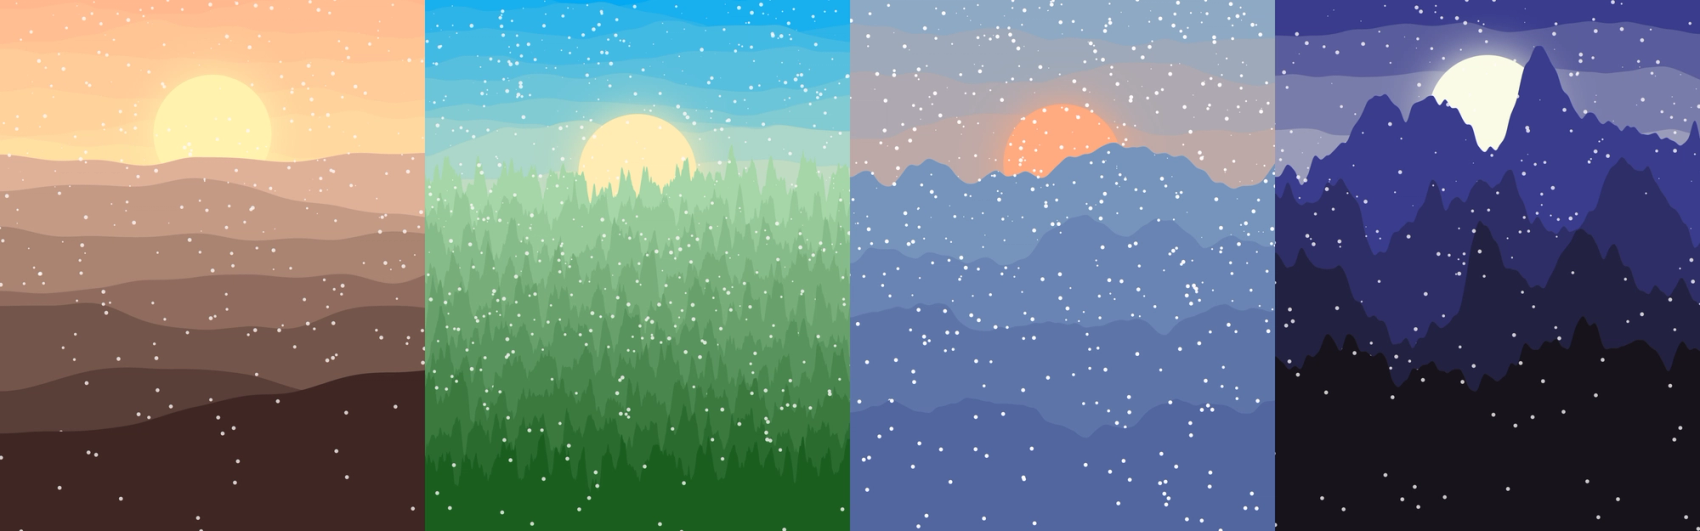
Simply tweaking the noise amp and zoom can make a big visual difference. In the image above we can make the ridges more akin to sand dunes, dense forests, or the kind of hostile looking mountains that are one medieval castle away from being the home of a secluded vampire. Colors make a huge difference too, as the dunes may as well be the rolling hills of a Windows wallpaper or waves at sea.
And that brings us to the end of this article! You can find the final source code in my generative art repository here.
Advice for aspiring artists
We've really only scratched the surface of what p5 is capable of, and what can be done in the world of generative art. Describing the full breadth of possibilities would require an article all by itself. So instead of that, I'll recommend some places you can get some inspiration! These days I get most of my inspiration from the subreddit r/generative as there are so many different people posting all kinds of crazy shit. There are also Instagram hashtags like #generativeart if that's more your kind of thing. For specific people to check out I'd recommend the following Instagram accounts:
Most importantly I hope you're inspired to make weird stuff of your own! I obviously recommend p5 as it feels super familiar if you've ever worked with JavaScript before. As mentioned earlier, they have some great examples where you can just jump into their web editor and get to tweaking. The reference really comes in handy along the way too.
I've only really been messing around with it here and there for a few months, as may be evident by my own Instagram account, but I find that the main limitation is creativity. Then again, I believe Steve Jobs said that great artists steal. I also believe he was quoting Picasso, who may have been rephrasing Igor Stravinsky, which really goes to show that the whole “take credit for someone else's idea” thing can really pan out in the end. I mean just look at The Lion King, the core concept is basically Hamlet with more talking animals and less murder.
That's why my artistic process usually just involves looking at all the great art other people make and wonder “how did they do that”, and then start trying to make it from scratch. It becomes reverse engineering of sorts, which can be a fun technical challenge by itself. And sure, sometimes it doesn't pan out. Maybe the sketch ends up being a bit too much of the same because you found the original to be just right. That's why I don't post a lot of what I make, it just feels like it's lacking a certain je ne sais quoi.
Other times though, something goes wrong in the right way. Maybe you multiplied the wrong variables together, or you wondered what would happen if you set a variable to something completely different. Suddenly you've turned your inspiration into something new entirely! That's why it doesn't do to dwell on creative integrity, what matters is that you just try stuff out and see what happens along the way. After all, we don't make mistakes, we just have happy accidents.